Hello! My next creation(more likely training) was Humanoid Robotic Arm!
This project was done as an internship at Li2 pvt ltd during the period of 10th January to 10th February.
Li2 pvt ltd gave an opportunity to show case our skills in arduino as well as manupulation of softwares for the need of the project,the supportive staff and environment always encouraged me.
The Project was done and made possible with help of my friend.So I will share maximum I can about the project which we did as an intern.
1st week: We started with gathering details,checking the inventory according to BOM given in the website of BCN3D . It is fully open source 3D printed robotic arm.
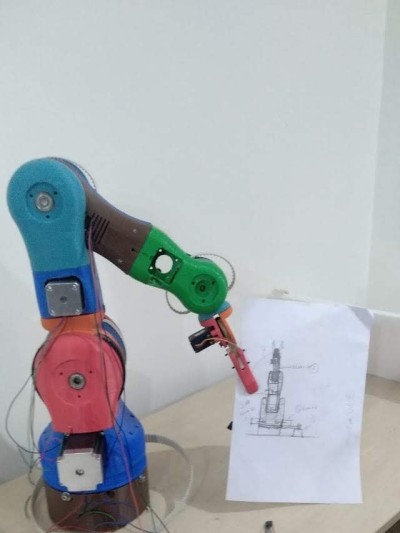
The project had some changes according to our level of knowledge,hence it was decided to be moved in only 2 directions z axis and y axis.
For reference I made an approximate drawing for the location of the motors and its appearance
Fig: drawing :

These are some of the main components we used:(more are given in BOM (pdf))
Fig: arduino mega:

Fig:Stepper Motor SM42HT47(nema 17):

Fig: Nema23:

Fig: Stepper motor driver (tb6560):

Fig: Gear Ratio 51 Planetary Gearbox Nema 17 Stepper:

Fig: Servo:

Fig:Power supply 24V:

Fig:Jumper wires:

2nd week: We started learning 3D printing from the incharge ,have a look what it looked like!!
The gripper parts after 3D printing. Fig: 3D printed gripper parts:

The base and middle part Fig: Base and Mid part:

It took almost took 2 weeks just to gather the things because of delay in delivery and availability of the components in the market,we had to go market about 5 or 6 times,just because of unavailability and sometimes because of our mistakes.
3rd week: We started assembly after completion and ongoing printing of some parts Here is the logic diagram Fig: Logic:

The base was assemble first without motors,as it was important to check whether the parts fit according to the requirements. Fig: Assembly1:

Since the top were still being printed ( each print took 6-7 hours) , the assembly of the gripper was done
Fig: Gripper:

After printing all the parts we started testing the motors arrived according to the specifications. We assembled all the motors with the parts,it was time taking task as the parts had to be opened again and each screw had its importance (we had to search many times as they used to roll away).
After assembly it looked like this Fig: Assembly 2:

Still we had to check whether the motors work under the load of the bolts We started with the upper body and voila!! We encountered our 1st problem!!
The upper motor wasn’t responding properly:
It took 2 days to rectify it
The only way to know other motors worked was to test after assembly of everything .The model was assembled without second thought about the base and we ended up having no base to keep the structure.The platform was searched and it was decided that the whole assembly had to be bolted down to a platform(we had to unscrew everything again!!!)
Fig :Before assembly:

After we assembled:
Fig:Formation side view:

Fig:Formation:

4th week:
After the assembly was bolted and assembled properly(finally!!!) ,the first test was run. and guess what?it was complete failure.
To know the cause, we dismantled it
We arrived at our 2nd problem.
The problem was still persisted after few attempts,but after testing so many times we got little bit information about the error.
It took few more attempts to understand the proper problem
It took 1 or 2 days and many attempts to rectify it.
This is the working model we recorded .
Benefits I recieved from this project: 1.An entirely new experience 2.Team membership. 3.Knowledge of the Market cost of NEMA motors. 4.Operations performed by CNC machines. 5.How stepper motor works. 6.Knowledge of 3D printing,cost and designing. 7.Time management. 8.Knowledge of autodesk inventor to model different things.
A special thanks to my partner ,Harsh Biradar and Li2 pvt ltd. who gave me assistance in every turn.